
There’s something oddly comforting about the smell of warm vanilla drifting through the kitchen. Every time I make custard, I feel like I’m stepping into an old family memory—even if it’s just a regular Tuesday night and I’m whisking away in my pajamas. The moment that milk begins to steam, I always get this tiny flutter of excitement because I know something creamy and wonderful is about to happen.
My earliest custard memory is being five years old, watching my grandmother swirl a wooden spoon around a pot with the patience of someone who truly loved feeding people. I remember standing on my little tiptoes, trying to peek into the saucepan as the mixture thickened. She’d always hand me the spoon for “quality control,” which basically meant licking off warm custard before it even reached a bowl.
As an adult, making classic vanilla custard from scratch feels like a small luxury—one that doesn’t cost much, doesn’t take long, and somehow makes even the most chaotic day feel like it’s ending on a soft note. There’s also the simple joy of hearing that gentle whisk-whisk-whisk sound as the custard slowly turns glossy and thick.
And honestly, I love how customizable custard is. Some nights I keep it classic; other nights I grate in some citrus zest or swirl in a bit of chocolate. You really can’t go wrong. It’s forgiving, it’s accessible, and it tastes like comfort itself.
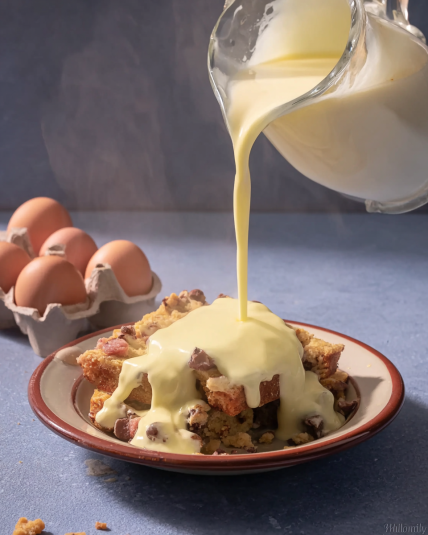
Best of all, custard makes everything better—cakes, pies, fruit, pastries, or just a quiet moment alone with a spoon. Yes, sometimes I eat it straight out of the pan. Zero shame.
Recipe Resume (Selling Points)
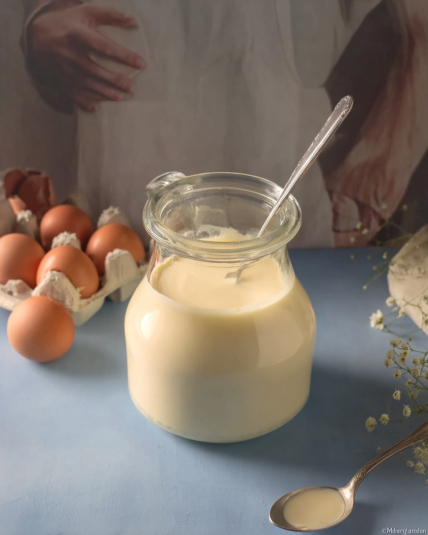
- Silky, creamy, rich texture.
- Ready in under 10 minutes.
- Only pantry staples needed.
- Foolproof smooth no-lump custard method.
- Perfect for layer desserts, tarts, and cakes.
- Beginner-friendly technique.
- Easy to customize with flavors.
- Works warm or chilled.
Why This Homemade Custard Is the Only One You’ll Ever Need
This recipe became “the one” the night my partner randomly asked if we had anything sweet. I had nothing baked, nothing chilled, nothing fancy—but I had eggs, sugar, and milk. Ten minutes later, we were standing in the kitchen eating warm custard out of mugs like kids hiding from responsibilities. Since then, it’s been our reliable, comforting go-to. Rooted in cozy American-style home cooking, this version hits every mark: simple ingredients, silky texture, and ridiculously satisfying flavor.
What You Really Need to Make This Amazing Homemade Custard (Simplified)
- 2 cups milk
- 3 egg yolks
- 3 tbsp sugar
- 2 tbsp cornstarch
- 1 tsp vanilla extract
- Pinch of salt
How to Master the Perfect Homemade Custard (My Secret Method)
Start by whisking the yolks, sugar, and cornstarch until they turn pale and thick—this early whisking is what makes the custard so smooth later. Warm the milk in a saucepan just until it steams, then pour it slowly into the yolk mixture while whisking like you’re teaching the eggs to stay calm.
Pour everything back into the pot, keep the heat low, and whisk gently. The moment it thickens—usually right when you think it’s going nowhere—it transforms into glossy stovetop custard with milk. Pull it off the heat, stir in the vanilla, and breathe in that comforting aroma.
Chef’s Notes and Tips For A Flawless Homemade Custard
Low and slow is the magic rule. High heat will curdle the mixture and create grainy bits. If the custard thickens too quickly, simply remove the pot from the heat and whisk to stabilize it. It’s surprisingly forgiving.
If small lumps sneak in, don’t panic—strain the custard while it’s still hot. You’ll instantly get back that silky, perfect texture you were aiming for without starting over.
Get Creative! Easy Substitutions and Fun Variations
Swap vanilla for almond or coconut extract. Add lemon zest for brightness, cocoa powder for chocolate custard, or a spoon of espresso for a mocha twist. To turn this into pastry cream, add an extra tablespoon of cornstarch and whisk in two tablespoons of butter at the end.
Lighten It Up! Simple Swaps for a Healthier Homemade Custard
Use low-fat milk, reduce the sugar, or sweeten with a low-calorie alternative. This recipe is naturally gluten-free. For a lighter feel, use only 1 tablespoon of cornstarch for a thinner, more pourable version—great for fruit bowls.
And there you have it!
A creamy, soothing custard that tastes like a warm hug. Don’t forget to tell us how your batch turns out, and check out our other recipes if you’re craving more comfort-food magic.
Are You Curious About Anything Else? Take a Look at the Most Frequently Asked Questions We Get About This Recipe
1. Why does my custard turn lumpy, and how do I fix it?
Lumps usually form when the mixture heats too fast and the egg proteins scramble. Using a gentle, steady temperature prevents this. This smooth no-lump custard method—constant whisking and slow heating—keeps everything silky. If lumps appear, press the custard through a fine mesh sieve. It instantly becomes smooth again, no flavor lost.
2. Can I make custard without cornstarch?
Absolutely. Traditional classic vanilla custard from scratch uses only egg yolks as a thickener. The texture will be looser, more like a pourable sauce. Just cook it a little longer while whisking, and let it thicken naturally.
3. How do I keep custard from tasting eggy?
An eggy flavor usually means the custard overheated. Keep the heat low, whisk nonstop, and remove it from the stove as soon as it thickens. Good vanilla extract also balances any sharp egg notes, giving the custard its signature mellow sweetness.
4. Can I use plant-based milk?
Yes, but textures vary. Almond, soy, and oat milk all work—just expect slightly lighter results. Add an extra teaspoon of cornstarch if you want your vegan custard thicker.
5. How should I store homemade custard?
Press plastic wrap directly onto the surface to prevent a skin from forming. It keeps in the refrigerator for up to three days. Reheat it gently on low heat, whisking until smooth.
6. Can I freeze custard?
Freezing isn’t ideal because custard can separate once thawed. If you must freeze it, reheat gently and whisk vigorously. But fresh is always best for that silky texture.
7. Can this custard be made ahead for desserts?
Yes, this is the best custard for desserts when prepping in advance. Make it the day before, refrigerate, and whisk it briefly before using to bring back its shine and smoothness.
8. Why is my custard too thin even after cooking?
It might not have reached the thickening temperature (around 82–85°C). Keep whisking on low heat until it coats the back of a spoon. If needed, return it gently to the stove—custard rewards patience.
Homemade Custard
4
servings30
minutes40
minutes300
kcalIngredients
2 cups milk
3 egg yolks
3 tbsp sugar
2 tbsp cornstarch
1 tsp vanilla extract
Pinch salt
Directions
- Start by whisking the yolks, sugar, and cornstarch until they turn pale and thick—this early whisking is what makes the custard so smooth later. Warm the milk in a saucepan just until it steams, then pour it slowly into the yolk mixture while whisking like you’re teaching the eggs to stay calm.
- Pour everything back into the pot, keep the heat low, and whisk gently. The moment it thickens—usually right when you think it’s going nowhere—it transforms into glossy stovetop custard with milk. Pull it off the heat, stir in the vanilla, and breathe in that comforting aroma.