
There’s something about soft, pillowy buns dusted in sugar that instantly takes me back. Not to a specific place, really—but to a feeling. Warm kitchen. Slightly messy counter. That quiet excitement before the first bite.
The first time I made these Danish carnival buns, I honestly didn’t expect much. I thought, “Okay, sweet bread with filling—nice.” But then… oh wow. The smell alone stopped me mid-step.
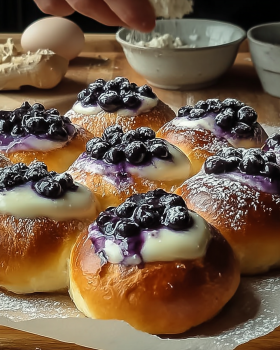
Buttery dough rising slowly. A hint of vanilla floating through the air. And then the filling—creamy, slightly tangy, almost cheesecake-like—just tucked inside like a little secret.
I remember pulling one apart too early (impatient, as always). Steam escaped, the filling softened even more, and I just stood there… staring. Then took a bite. Game over.
What I love most is how these feel fancy but aren’t. You don’t need perfect shaping or bakery skills. They come out charmingly imperfect—and honestly, that’s part of the magic.
They’re also surprisingly versatile. You can go classic, or twist them into your own thing depending on what’s in your fridge.
And yes, they’re indulgent. But in that comforting, worth-it kind of way.
If you’ve never tried homemade Danish carnival buns (fastelavnsboller), this might be the one that hooks you.
Recipe Resume (Why You’ll Love It)
Soft, cloud-like texture.
Rich cheesecake-style filling.
Lightly sweet, never overwhelming.
Beginner-friendly dough.
Freezer-friendly (huge bonus).
Perfect for holidays—or random Tuesdays.
Customizable fillings.
Smells like a bakery exploded in your kitchen.
Why This Danish Carnival Buns Recipe Is The Only One You’ll Ever Need
I made these for a small family gathering once—nothing fancy, just coffee and catching up. I placed them on the table casually, like, “Oh yeah, I made these.”
Five minutes later? Silence. Just chewing.
Then someone asked, “Did you buy these?” That question always makes me laugh. Because no—these came from my slightly chaotic kitchen, flour on my sleeves and all.
The real turning point was when my cousin asked for the recipe before even finishing her bun. That’s when I knew: this one stays.
Cuisine: Danish / European
What You Really Need to Make This Amazing Danish Carnival Buns (Simplified)
- 3 cups all-purpose flour
- 2¼ tsp yeast
- ½ cup warm milk
- ¼ cup sugar
- 1 egg
- ¼ cup butter (softened)
- Pinch of salt
Cheesecake Filling:
- 1 cup cream cheese
- ¼ cup sugar
- 1 tsp vanilla
Optional:
- Jam (raspberry or strawberry)
- Powdered sugar for topping
How to Master the Perfect Danish Carnival Buns (My Secret Method)
Start by waking up your yeast—just warm milk and a little sugar. Let it sit until it gets foamy. If it doesn’t? Don’t panic, just start again. It happens.
Now mix everything together—flour, egg, butter, salt. The dough will feel soft, slightly sticky. That’s exactly what you want.
Knead it gently. Not aggressively. Think of it like persuading the dough, not fighting it. After about 8 minutes, it becomes smooth and elastic.
Let it rise. This is where patience kicks in. Cover it, walk away, maybe make coffee. When you come back, it should feel alive—puffed and airy.
Meanwhile, mix your cheesecake filling. Taste it. Adjust sweetness if needed (I always do).
Divide the dough into small pieces, flatten slightly, and add a spoon of filling in the center. Fold carefully—don’t overthink the shape.
Bake until golden. Your kitchen will smell ridiculous at this point.
Let them cool just slightly… then dust with powdered sugar.
And yes, eat one warm. You deserve it.
Chef’s Notes and Tips For A Flawless Danish Carnival Buns
The dough is everything here. If it feels too stiff, add a splash of milk. Too sticky? A bit more flour—but go slowly. Over-flouring is the quickest way to lose that soft texture.
Also, don’t rush the rise. I know it’s tempting, but that slow rise is what gives you that fluffy, bakery-style bite. A warm (not hot!) place works best.
For the filling, room temperature cream cheese is key. Cold cream cheese won’t blend smoothly and you’ll end up with lumps—and no one wants that surprise.
Get Creative! Easy Substitutions and Fun Variations
Swap the cheesecake filling for pastry cream if you want a more traditional fastelavnsboller vibe.
Add a spoon of jam inside for that sweet-tangy contrast—it’s honestly amazing.
Chocolate lovers? Toss in some chocolate chips or a Nutella center.
You can even top them with glaze instead of powdered sugar for a more bakery-style finish.
Lighten It Up! Simple Swaps for a Healthier Danish Carnival Buns
Use low-fat cream cheese to cut some calories without losing creaminess.
Reduce sugar slightly—the filling is forgiving.
Swap half the flour for whole wheat for a nuttier flavor (texture will be slightly denser).
Or make mini buns—same flavor, smaller portions.
Closing
And there you have it! Soft, creamy, slightly messy, and completely irresistible Danish carnival buns.
Don’t forget to let me know how yours turn out—and maybe try not to eat three in one sitting (no promises).
Are You Curious About Anything Else? Take a Look at the Most Frequently Asked Questions We Get About This Recipe:
1. What are Danish carnival buns (fastelavnsboller)?
Danish carnival buns, also known as fastelavnsboller, are traditional sweet buns enjoyed during carnival season in Denmark. They’re typically soft, enriched yeast buns filled with cream, custard, or jam.
What makes this version special is the cheesecake-style filling, which adds a creamy, slightly tangy twist that feels both modern and indulgent. It’s not strictly traditional—but honestly, it might be even better.
2. Can I make these Danish carnival buns ahead of time?
Yes, and they actually hold up quite well. You can prepare the dough the night before and let it rise slowly in the fridge.
Once baked, store them in an airtight container. They’re best within 1–2 days, but you can reheat them gently to bring back that soft texture.
3. Why is my dough not rising properly?
This usually comes down to yeast issues. Either the milk was too hot (which kills yeast) or too cold (which doesn’t activate it).
Also, check the freshness of your yeast. Even slightly expired yeast can lead to flat, dense buns instead of fluffy Danish carnival buns.
4. Can I freeze Danish carnival buns?
Absolutely. Freeze them after baking and cooling completely.
When you’re ready to eat, thaw at room temperature and warm slightly in the oven. They’ll taste almost as fresh as the day you made them.
5. What filling works best for fastelavnsboller?
Traditional fillings include custard, whipped cream, and jam. But this cheesecake filling brings a richer texture and deeper flavor.
You can also mix fillings—like cream cheese plus raspberry jam—for something really special.
6. How do I keep the filling from leaking out?
Seal the dough carefully. Pinch the edges well and place the seam side down.
Also, don’t overfill. It’s tempting, I know—but too much filling will escape during baking.
7. Can I make these buns without yeast?
You can try a quick dough version using baking powder, but the texture won’t be the same.
Yeast is what gives Danish carnival buns that signature fluffy, airy bite. It’s worth the extra time.
8. How do I get that soft bakery-style texture?
It’s all about hydration and kneading. A slightly soft dough plus proper kneading creates that elastic structure.
And don’t skip the rise. That slow fermentation is what transforms simple ingredients into something truly special.
Danish Carnival Buns: Fluffy Treats with Sweet Cheesecake Bliss
4
servings30
minutes40
minutes300
kcalIngredients
3 cups all-purpose flour
2 ¼ tsp yeast
½ cup warm milk
¼ cup sugar
1 egg
¼ cup butter (softened)
Pinch salt
Cheesecake Filling:
1 cup cream cheese
¼ cup sugar
1 tsp vanilla
Optional:
Jam (raspberry or strawberry)
Powdered sugar for topping
Directions
- Start by waking up your yeast—just warm milk and a little sugar. Let it sit until it gets foamy. If it doesn’t? Don’t panic, just start again. It happens.
- Now mix everything together—flour, egg, butter, salt. The dough will feel soft, slightly sticky. That’s exactly what you want.
- Knead it gently. Not aggressively. Think of it like persuading the dough, not fighting it. After about 8 minutes, it becomes smooth and elastic.
- Let it rise. This is where patience kicks in. Cover it, walk away, maybe make coffee. When you come back, it should feel alive—puffed and airy.
- Meanwhile, mix your cheesecake filling. Taste it. Adjust sweetness if needed (I always do).
- Divide the dough into small pieces, flatten slightly, and add a spoon of filling in the center. Fold carefully—don’t overthink the shape.
- Bake until golden. Your kitchen will smell ridiculous at this point.
- Let them cool just slightly… then dust with powdered sugar.
- And yes, eat one warm. You deserve it.