
Some snacks disappear so fast you start questioning whether you actually made them.
That’s exactly what happens with this homemade chocolate chip granola bars recipe.
The first time I made them, I was trying to be organized.
You know—meal prep, healthy snacks, responsible adult behavior.
Very ambitious.
I bought oats, honey, peanut butter, mini chocolate chips… and fully believed I was becoming one of those people with perfectly stocked containers and calm mornings.
That lasted about twelve minutes.
Because once these bars were chilled, sliced, and sitting on the counter, they became less of a “planned snack” and more of a family-wide treasure hunt.
Everyone kept taking “just one.”
Including me.
Especially me.
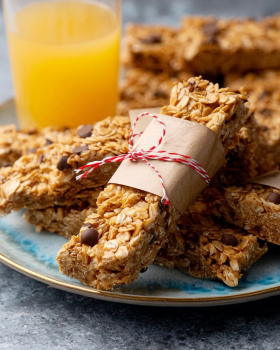
They’re chewy, sweet, a little nutty, and somehow manage to feel like both a treat and a reasonable breakfast decision. Honestly, that’s the dream.
The chocolate chips make them feel fun, while the oats and nut butter let you pretend you’re being incredibly balanced and wise.
Now these easy chewy chocolate chip granola bars are permanently in my kitchen rotation—for lunchboxes, road trips, busy mornings, and those mysterious 9 PM snack emergencies.
They never last long.
Never.
Quick Recipe Resume: Why You Need These This Week
Chewy and satisfying.
Sweet but balanced.
Perfect for meal prep.
Kid-approved immediately.
No weird ingredients.
Better than packaged bars.
Easy grab-and-go snack.
Dangerously snackable.
Why This Chocolate Chip Granola Bars Recipe Is The Only One You’ll Ever Need
Cuisine: American Snack
My husband once called these “breakfast cookies pretending to be healthy.”
Honestly? That’s the best compliment possible.
The first time I made these kid friendly homemade granola bars, I packed them for lunch thinking they’d last the whole week.
Cute idea.
They were gone by Wednesday.
That’s when I realized this recipe had entered permanent status.
I love them because they’re flexible, forgiving, and they make life easier without asking much from you.
No fancy baking skills.
No complicated ingredients.
Just mix, press, chill, and try not to hover near the fridge like a suspicious raccoon.
What You Really Need to Make This Amazing Chocolate Chip Granola Bars (Simplified)
- 2 ½ cups old-fashioned oats
- ½ cup peanut butter
- ⅓ cup honey
- ¼ cup maple syrup
- 1 teaspoon vanilla extract
- ½ teaspoon cinnamon
- ¼ teaspoon salt
- ½ cup mini chocolate chips
- ¼ cup chopped almonds or walnuts (optional)
- 2 tablespoons flaxseed (optional)

How to Master the Perfect Chocolate Chip Granola Bars (My Secret Method)
Start by lightly toasting the oats if you have five extra minutes. It adds a warm, nutty flavor that makes people think you worked harder than you did.
In a saucepan, gently warm the peanut butter, honey, and maple syrup until smooth and glossy.
Not boiling. Just warm enough to make everything cooperate.
Stir in vanilla, cinnamon, and salt.
Now pour that sticky magic over the oats and mix like you mean it.
Let it cool slightly before adding chocolate chips unless you’re aiming for granola bar soup. Which, respectfully, we are not.
Fold in the chocolate chips and nuts.
Press everything firmly into a lined pan. Firmly means firmly. This is what keeps bars from becoming crumbly little heartbreaks.
Chill for at least 2 hours, slice into bars, and pretend you made them for sharing.
Chef’s Notes and Tips For A Flawless Chocolate Chip Granola Bars
Pressing the mixture tightly is the secret. Loose bars crumble. Firm bars hold together like they’ve been through therapy.
Mini chocolate chips work better than regular ones because they distribute more evenly and make every bite feel fair.
If making no bake chocolate chip granola bars, chilling time matters. Don’t rush it. Warm bars are delicious chaos.
And store them in the fridge if your kitchen runs warm—they stay perfectly chewy that way.
Get Creative! Easy Substitutions and Fun Variations
Swap peanut butter for almond butter, sunflower seed butter, or cashew butter depending on allergies or preferences.
Add dried cranberries, coconut flakes, pumpkin seeds, or chia seeds for more texture and flavor.
Want dessert energy? Add white chocolate chips or drizzle melted dark chocolate on top.
Honestly, I support dramatic granola bars.
Lighten It Up! Simple Swaps for a Healthier Chocolate Chip Granola Bars
For healthier chocolate chip oat bars homemade, reduce the chocolate chips slightly and add extra nuts or seeds for protein.
Use natural peanut butter and unsweetened nut butter options to reduce added sugar.
You can also replace part of the honey with mashed banana for a softer, naturally sweet version.
Still chewy. Still delicious. Just slightly less “accidentally ate four.”
Closing
And there you have it!
A homemade chocolate chip granola bars recipe that’s simple, chewy, sweet, and way better than anything in a shiny grocery store box.
They’re perfect for breakfast, snacks, lunchboxes, and those random moments when life clearly requires chocolate.
Try them once and I promise—they’ll become one of your repeat recipes.
And don’t forget to let us know how your batch turns out, and maybe check out a few more of our favorite easy homemade snack recipes while you’re here.
Are You Curious About Anything Else? Take a Look at the Most Frequently Asked Questions We Get About This Recipe
1. Why are my granola bars falling apart?
Usually it comes down to not pressing the mixture firmly enough.
For the best homemade chocolate chip granola bars recipe, really pack the mixture tightly into the pan and give it enough chill time before slicing.
2. Can I make granola bars without baking?
Absolutely.
No bake chocolate chip granola bars are actually one of the easiest versions. Chilling helps them set beautifully without needing the oven.
3. How long do homemade granola bars last?
Usually about 1 week in the fridge.
Stored in an airtight container, easy chewy chocolate chip granola bars stay fresh, chewy, and ready for snack emergencies.
4. Can I make these nut-free?
Yes.
Use sunflower seed butter and skip tree nuts for a great kid friendly homemade granola bars version that works for more lunchboxes.
5. Are homemade granola bars healthier than store-bought?
Often, yes.
You control the ingredients, sugar levels, and add-ins, making healthy chocolate chip oat bars homemade a much more flexible and balanced option.
6. Can I freeze granola bars?
Definitely.
Wrap them individually and freeze for up to 2 months. They thaw quickly and make meal prep feel extremely impressive.
7. What oats work best for granola bars?
Old-fashioned rolled oats work best.
Quick oats can make the bars too soft, while steel-cut oats are too firm for this recipe.
8. Can I use protein powder in granola bars?
Yes, but carefully.
Replace a small portion of oats, not too much, or the bars can become dry. A little protein boost works beautifully without ruining texture.
Chocolate Chip Granola Bars
4
servings30
minutes40
minutes300
kcalIngredients
2 ½ cups old-fashioned oats
½ cup peanut butter
⅓ cup honey
¼ cup maple syrup
1 teaspoon vanilla extract
½ teaspoon cinnamon
¼ teaspoon salt
½ cup mini chocolate chips
¼ cup chopped almonds or walnuts (optional)
2 tablespoons flaxseed (optional)
Directions
- Start by lightly toasting the oats if you have five extra minutes. It adds a warm, nutty flavor that makes people think you worked harder than you did.
- In a saucepan, gently warm the peanut butter, honey, and maple syrup until smooth and glossy.
- Not boiling. Just warm enough to make everything cooperate.
- Stir in vanilla, cinnamon, and salt.
- Now pour that sticky magic over the oats and mix like you mean it.
- Let it cool slightly before adding chocolate chips unless you’re aiming for granola bar soup. Which, respectfully, we are not.
- Fold in the chocolate chips and nuts.
- Press everything firmly into a lined pan. Firmly means firmly. This is what keeps bars from becoming crumbly little heartbreaks.
- Chill for at least 2 hours, slice into bars, and pretend you made them for sharing.