
There’s something about Easter that makes me feel like a kid again. Maybe it’s the pastel colors, or the way everything suddenly feels softer, sweeter… lighter somehow.
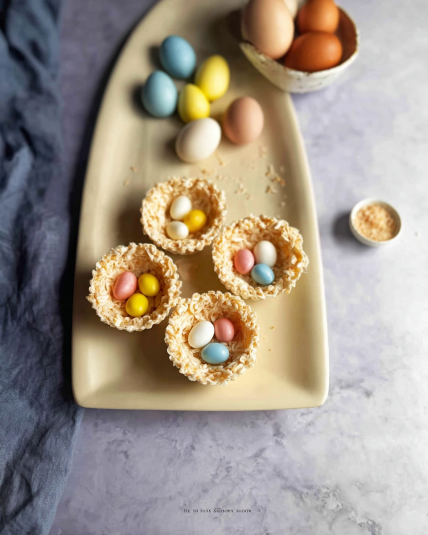
I remember the first time I made these Easter Rice Krispies nests with chocolate eggs—it wasn’t planned. I had marshmallows, cereal, and a bag of mini eggs staring at me from the pantry. That was it. No grand recipe. Just a craving and a little curiosity.
And honestly? The smell alone sold me. That warm, buttery marshmallow melting into crispy cereal… it’s one of those scents that instantly wraps around you like a cozy blanket.
What I love most is how imperfect they are. Each nest comes out a little different—some messy, some neat—but all of them charming in their own way. Kind of like Easter itself.
These no bake Easter Rice Krispies nests recipe moments are perfect for busy days. No oven. No stress. Just quick, sticky fun.
And if you’ve got kids around? Even better. This turns into a full-on memory-making session rather than just “making dessert.”
I’ve made these for family gatherings, last-minute parties, and even just quiet afternoons when I needed a little sweetness. They never disappoint.
So if you’re looking for something simple, nostalgic, and just plain joyful… you’re in the right place.
Recipe Resume (Why You NEED This)
No oven needed. Seriously.
Ready in under 20 minutes.
Kid-friendly and mess-approved.
Uses simple pantry ingredients.
Perfect last-minute Easter dessert.
Customizable with colors and candies.
Light, crispy, and sweet—but not heavy.
They look adorable without trying too hard.
Why This Easter Rice Krispies Nests Is The Only One You’ll Ever Need
The first time I made these for a family Easter brunch, I didn’t expect much. I thought they’d just sit quietly next to the fancier desserts.
I was wrong.
My little cousin grabbed one, then another. My aunt asked for the “recipe”—which made me laugh because it barely felt like one. Even my brother, who usually skips sweets, kept sneaking back.
That’s when I realized something: these easy Rice Krispies nests for kids Easter treats hit differently. They’re playful. They’re nostalgic. And they don’t try too hard.
They’ve since become a tradition. Slightly chaotic, always fun, and never exactly the same twice.
Cuisine: American
What You Really Need to Make This Amazing Easter Rice Krispies Nests (Simplified)
- 3 cups Rice Krispies cereal
- 2 cups mini marshmallows
- 2 tablespoons butter
- 1 teaspoon vanilla extract (optional, but lovely)
- Mini chocolate eggs (Cadbury-style or similar)
- Cooking spray or parchment paper
How to Master the Perfect Easter Rice Krispies Nests (My Secret Method)
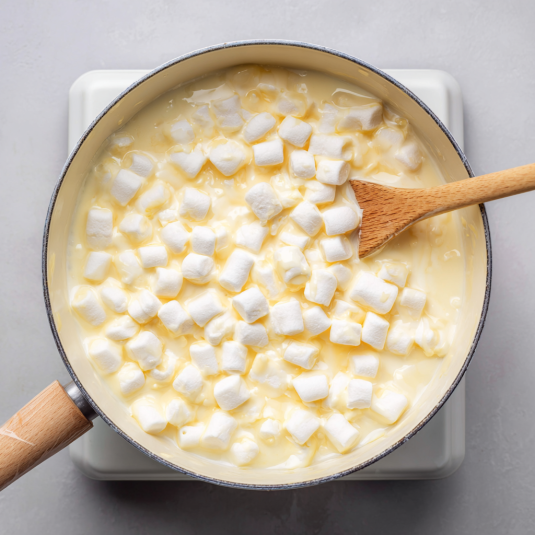
Start by grabbing your favorite saucepan—nothing fancy. Melt the butter slowly over low heat. You don’t want it sizzling, just gently melting like it’s waking up.
Add the marshmallows and stir. This is the part where things get dreamy. They’ll slowly collapse into a smooth, glossy mixture. Keep stirring so nothing sticks or burns.
Once it’s silky, take it off the heat and stir in the vanilla. That tiny step? It makes a difference.
Now pour in the cereal. Don’t dump it all at once—add it gradually and fold it in. You want every piece coated, but not crushed.
Lightly grease your hands (trust me on this), then scoop out small portions and shape them into little nests on parchment paper. Press gently in the center to create that “nest” dip.
Work quickly—the mixture sets fast!
Finally, while they’re still soft, place a few mini chocolate eggs in each nest. Press just enough so they stick.
Let them cool for about 15–20 minutes… if you can wait that long.
Chef’s Notes and Tips For A Flawless Easter Rice Krispies Nests
The biggest mistake? Overheating the marshmallows. If they get too hot, your nests turn hard instead of soft and chewy. Keep the heat low and stay patient—it’s worth it.
Also, timing matters more than precision here. Once you mix in the cereal, you’ve got a short window before things stiffen up. So have your workspace ready before you start shaping.
Get Creative! Easy Substitutions and Fun Variations
Swap Rice Krispies with cocoa cereal for a chocolate twist.
Use white chocolate drizzle for a bakery-style finish.
Add shredded coconut for a more realistic “nest” look.
Try jelly beans instead of chocolate eggs for a fruity pop.
Make mini nests in muffin tins for uniform shapes.
Lighten It Up! Simple Swaps for a Healthier Easter Rice Krispies Nests
Use brown rice cereal for a slightly more wholesome base.
Reduce marshmallows slightly and add a spoon of peanut butter for richness without extra sugar.
Choose dark chocolate eggs for less sweetness and more depth.
You can even try sugar-free marshmallows if you’re watching your intake—just note the texture might change slightly.
Closing
And there you have it! Sweet, simple, and just a little magical.
These quick Easter dessert nests without oven effort are the kind of treat that brings people together—no perfection required.
Give them a try, make a mess, and enjoy every bite. And hey, don’t forget to explore more cozy recipes while you’re here!
Are You Curious About Anything Else? Take a Look at the Most Frequently Asked Questions We Get About This Recipe:
1. Can I make Easter Rice Krispies nests ahead of time?
Absolutely—and that’s actually one of the best things about this no bake Easter Rice Krispies nests recipe. You can prepare them up to 2–3 days in advance, which makes them perfect for busy holiday schedules or party prep.
Store them in an airtight container at room temperature. Avoid the fridge if possible, as it can make them lose that soft, chewy texture and turn slightly firm. If your kitchen is warm, keep them in a cool, dry place instead.
If you’re planning ahead for an event, I recommend adding the chocolate eggs the day of serving. This keeps them looking fresh and prevents any color bleeding or melting.
2. Why are my Rice Krispies nests hard instead of chewy?
This usually comes down to heat. When making marshmallow cereal Easter nests recipe, overheating the marshmallows changes their texture, making the final result hard instead of soft.
Stick to low heat and stir constantly. As soon as the marshmallows melt into a smooth mixture, remove from heat immediately. Don’t let them bubble aggressively.
Another factor is pressing too hard when shaping. Gentle hands create soft nests—firm packing leads to dense, hard bites.
3. Can I make these Easter nests without marshmallows?
Yes, but it changes things quite a bit. Marshmallows are what give these easy Rice Krispies nests for kids Easter treats their signature texture and sweetness.
If you want an alternative, you can use a mixture of honey and peanut butter or melted chocolate as a binder. Keep in mind, the flavor and texture will be richer and less airy.
It’s a great option if you’re avoiding marshmallows, but the classic version is hard to beat.
4. What’s the best cereal to use for Rice Krispies nests?
Classic Rice Krispies are ideal because they’re light and crisp, creating that airy nest structure. But you’re not limited to just that.
You can experiment with similar puffed rice cereals, cocoa-flavored versions, or even cornflakes for a crunchier bite. Each variation brings its own personality to this quick Easter dessert nests without oven recipe.
Just avoid cereals that are too dense—they won’t hold the shape as well.
5. How do I keep the nests from sticking to my hands?
Ah, the sticky struggle—it’s real. The easiest fix is lightly greasing your hands with butter or cooking spray before shaping the nests.
You can also use a spoon or even lightly greased gloves if you prefer less mess. Some people use muffin tins to skip hand-shaping altogether.
The key is working quickly while the mixture is still warm but manageable.
6. Can kids safely help make this recipe?
Yes—and they should! This is one of the best Easter Rice Krispies nests with chocolate eggs activities for kids because it’s simple and fun.
The only part that needs adult supervision is melting the marshmallows on the stove. Once that’s done, kids can help mix, shape, and decorate.
It turns into more than a recipe—it becomes a memory.
7. How do I store leftovers properly?
Keep your nests in an airtight container at room temperature. They’ll stay fresh for about 2–3 days.
Avoid stacking them too tightly, as they can stick together. If needed, place parchment paper between layers.
Humidity can affect texture, so a cool, dry environment is best for preserving that perfect chew.
8. Can I freeze Rice Krispies nests?
You can, but it’s not ideal. Freezing tends to change the texture of this no bake Easter Rice Krispies nests recipe, making them slightly tougher once thawed.
If you do freeze them, wrap each nest individually and store in an airtight container. Let them thaw at room temperature—never microwave, as that can ruin the structure.
For best results, enjoy them fresh or within a couple of days.
Easter Rice Krispies Nests
4
servings30
minutes40
minutes300
kcalIngredients
3 cups Rice Krispies cereal
2 cups mini marshmallows
2 tablespoons butter
1 teaspoon vanilla extract (optional, but lovely)
Mini chocolate eggs (Cadbury-style or similar)
Cooking spray or parchment paper
Directions
- Start by grabbing your favorite saucepan—nothing fancy. Melt the butter slowly over low heat. You don’t want it sizzling, just gently melting like it’s waking up.
- Add the marshmallows and stir. This is the part where things get dreamy. They’ll slowly collapse into a smooth, glossy mixture. Keep stirring so nothing sticks or burns.
- Once it’s silky, take it off the heat and stir in the vanilla. That tiny step? It makes a difference.
- Now pour in the cereal. Don’t dump it all at once—add it gradually and fold it in. You want every piece coated, but not crushed.
- Lightly grease your hands (trust me on this), then scoop out small portions and shape them into little nests on parchment paper. Press gently in the center to create that “nest” dip.
- Work quickly—the mixture sets fast!
- Finally, while they’re still soft, place a few mini chocolate eggs in each nest. Press just enough so they stick.
- Let them cool for about 15–20 minutes… if you can wait that long.