
I wasn’t planning on making anything memorable that evening. It was one of those “just throw something together” kind of nights—you know the ones.
I had kielbasa in the fridge, brown sugar in the pantry, and honestly… not much motivation. But somehow, that combination sparked something.
The moment the kielbasa hit the pan and started to sizzle, I knew I was onto something. That smoky aroma? It fills the kitchen fast—and in the best way.
Then came the brown sugar. As it melted, it turned into this glossy, bubbling glaze that felt almost too simple to be this good.
I remember standing there, stirring, thinking, “This can’t be it… can it?” But it was.
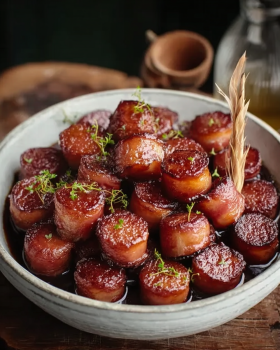
The first bite was that perfect mix—sweet, salty, a little sticky, a little caramelized around the edges. The kind of bite that makes you pause for a second.
I ended up eating way more than I planned. No regrets.
Now this candied kielbasa bites recipe easy has become my go-to whenever I need something quick that feels like a win.
Recipe Resume (Quick Selling Points)
Quick and easy.
Only a few ingredients.
Sweet and savory perfection.
Ready in under 30 minutes.
Perfect party appetizer.
Minimal prep required.
Big flavor, low effort.
Always a crowd favorite.
Why This Candied Kielbasa Bites Recipe Easy Is The Only One You’ll Ever Need
The first time I made these for a small gathering, I didn’t even think to double the batch. Rookie mistake.
I set them out, still warm, and within minutes… half the tray was gone. No exaggeration.
Someone asked, “Wait, what’s in this?” like it had to be complicated. I almost laughed because it really isn’t.
That’s the magic of a good brown sugar glazed kielbasa appetizer—it tastes like you tried harder than you actually did.
Now I just make extra. Every time.
Cuisine Type: American comfort / party appetizer
What You Really Need to Make This Amazing Candied Kielbasa Bites Recipe Easy (Simplified)
- 2 kielbasa sausages (sliced into bite-sized pieces)
- 1 cup brown sugar
- 1/2 cup barbecue sauce
- 1 tbsp Dijon mustard (optional)
- 1 tsp garlic powder
- Optional: pinch of chili flakes

How to Master the Perfect Candied Kielbasa Bites Recipe Easy (My Secret Method)
Start with a pan over medium heat. Add your sliced kielbasa and let it cook for a few minutes. You’re not rushing—just letting those edges brown slightly.
Once you see that golden color forming, that’s your cue.
Sprinkle the brown sugar right over the kielbasa. It’ll look like too much at first. It’s not. Trust the process.
Add barbecue sauce and mustard, then gently stir everything together. Slowly, the sugar melts and blends into the sauce.
Lower the heat just a bit and let it simmer. You’ll notice the sauce thickening, turning glossy, coating each piece beautifully.
Stir occasionally—just enough to keep things from sticking.
After about 15–20 minutes, the kielbasa should be fully coated in a sticky, caramelized glaze.
Taste one (careful, it’s hot). Adjust seasoning if needed.
Serve warm… and watch them disappear.
Chef’s Notes and Tips For A Flawless Candied Kielbasa Bites Recipe Easy
The key to a perfect sweet and savory kielbasa bites oven recipe—or stovetop version—is controlling the heat. Too high, and the sugar burns. Too low, and you don’t get that rich caramelization.
Also, don’t overcrowd your pan. Giving the kielbasa space helps it brown properly before the sauce thickens, which adds another layer of flavor.
Get Creative! Easy Substitutions and Fun Variations
You can easily adapt this how to make candied kielbasa with brown sugar recipe. Swap barbecue sauce with honey mustard for a different twist.
Want more heat? Add hot sauce or extra chili flakes.
You can even bake these in the oven for a slightly crispier texture—just toss everything together and roast until caramelized.
Lighten It Up! Simple Swaps for a Healthier Candied Kielbasa Bites Recipe Easy
Use turkey or chicken kielbasa for a lower-fat option.
Reduce the brown sugar slightly and use a low-sugar barbecue sauce.
You can also add roasted vegetables like peppers or onions to balance the richness.
Closing
And there you have it! Sweet, sticky, and completely addictive bites that come together faster than you’d expect. Try them once—and don’t be surprised if they become your new party favorite. Let me know how it turns out!
Are You Curious About Anything Else? Take a Look at the Most Frequently Asked Questions We Get About This Recipe:
1. How do I make candied kielbasa bites recipe easy at home?
To make a candied kielbasa bites recipe easy at home, start by slicing your kielbasa into bite-sized pieces and browning them in a pan. This step builds flavor and gives the sausage a slightly crispy edge.
Next, add brown sugar and barbecue sauce, allowing everything to simmer together. The sugar melts and thickens into a glaze that coats the kielbasa evenly. Keep the heat moderate to avoid burning and stir occasionally for best results.
2. Can I bake a sweet and savory kielbasa bites oven recipe instead?
Yes, you can absolutely prepare a sweet and savory kielbasa bites oven recipe. Simply toss the kielbasa with the sauce ingredients and spread them on a baking sheet.
Bake at around 180°C (350°F) for 25–30 minutes, stirring halfway through. The oven method gives you slightly crisp edges while still maintaining that sticky glaze.
3. What makes a brown sugar glazed kielbasa appetizer so popular?
The combination of sweet brown sugar and smoky sausage creates a perfect balance of flavors. The glaze caramelizes during cooking, adding depth and richness.
This contrast between sweet and savory is what makes the dish so addictive and appealing to a wide range of tastes.
4. Can I prepare kielbasa bites ahead of time?
Yes, and they reheat well. Store them in an airtight container in the refrigerator for up to 3 days.
When reheating, use low heat and stir gently to maintain the glaze. Adding a splash of water or sauce can help refresh the texture.
5. How do I keep the glaze from burning?
The key is controlling the heat. Cook on medium to low heat once the sugar is added, and avoid letting the mixture boil too aggressively.
Stirring occasionally also helps prevent sticking and burning.
6. Can I freeze candied kielbasa bites?
Yes, they can be frozen for up to 2 months. Let them cool completely before storing.
When reheating, thaw first and warm gently to preserve the texture of the glaze.
7. What sides go well with kielbasa bites?
These best kielbasa bites for parties easy pair well with simple sides like bread, crackers, or fresh vegetables.
They also work great alongside other appetizers for a party spread.
8. Can I reduce the sweetness in this recipe?
Absolutely. Reduce the brown sugar or choose a less sweet barbecue sauce.
You can also add mustard or vinegar to balance the flavors and make the dish more savory.
Candied Kielbasa Bites
4
servings30
minutes40
minutes300
kcalIngredients
2 kielbasa sausages (sliced into bite-sized pieces)
1 cup brown sugar
1/2 cup barbecue sauce
1 tbsp Dijon mustard (optional)
1 tsp garlic powder
Optional: pinch of chili flakes
Directions
- Start with a pan over medium heat. Add your sliced kielbasa and let it cook for a few minutes. You’re not rushing—just letting those edges brown slightly.
- Once you see that golden color forming, that’s your cue.
- Sprinkle the brown sugar right over the kielbasa. It’ll look like too much at first. It’s not. Trust the process.
- Add barbecue sauce and mustard, then gently stir everything together. Slowly, the sugar melts and blends into the sauce.
- Lower the heat just a bit and let it simmer. You’ll notice the sauce thickening, turning glossy, coating each piece beautifully.
- Stir occasionally—just enough to keep things from sticking.
- After about 15–20 minutes, the kielbasa should be fully coated in a sticky, caramelized glaze.
- Taste one (careful, it’s hot). Adjust seasoning if needed.
- Serve warm… and watch them disappear.