
There’s something about the smell of yeasted dough that instantly makes a kitchen feel alive. Warm. Expectant. The kind of smell that makes people wander in and ask, “What are you making?” before you’ve even answered yourself.
The first time I made Russian piroshki, I underestimated them. I thought they were just stuffed buns. Simple. Nice. Fine.
They were not fine. They were everything.
As the dough puffed gently under a towel, the filling simmered nearby—savory, comforting, familiar in a way I couldn’t quite place. Onions softening. Meat browning. That deep, homey aroma that feels like someone taking care of you.
Piroshki aren’t rushed food. They ask you to slow down, to feel the dough, to listen to it. Too sticky? Dust a little flour. Too stiff? Let it rest. It’s a conversation.
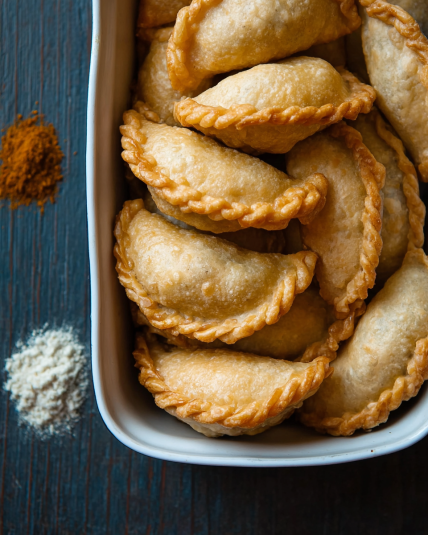
When they hit the oil—or the oven—the transformation is magical. Golden. Puffy. Quietly proud of themselves.
These traditional Russian piroshki are humble, generous, and deeply satisfying. The kind of food that makes people linger at the table just a little longer.
Recipe Resume (Why You’ll Want These Piroshki Today)
Soft, fluffy dough
Savory, comforting filling
Perfect handheld food
Freezer-friendly
Crowd-pleasing classic
Fried or baked options
Authentic Russian flavor
Worth every minute
Why This Russian Piroshki Is The Only One You’ll Ever Need
I first made these on a cold afternoon, mostly to see if I could. Halfway through shaping them, my kitchen looked like a flour bomb had gone off. Not elegant. Not Instagram-perfect.
But when we bit into the first one—hot, tender, savory—no one cared.
This recipe stayed because it works. Every time. It’s forgiving. It tastes like home even if it’s your first attempt.
Cuisine: Russian / Eastern European
What You Really Need to Make This Amazing Russian Piroshki (Simplified)
For the dough:
- Warm milk
- Active dry yeast
- Sugar
- Eggs
- Butter or oil
- All-purpose flour
- Salt
For the filling (classic):
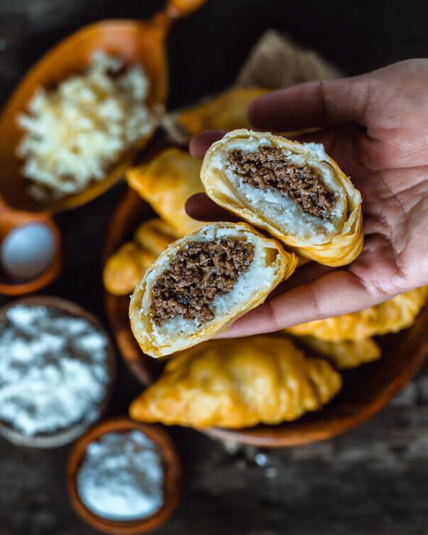
- Ground beef (or beef/pork mix)
- Onion
- Salt and pepper
Simple ingredients. Big comfort.
How to Master the Perfect Russian Piroshki (My Secret Method)
Start with the dough. Bloom the yeast in warm milk with sugar—give it a few minutes until it looks alive and bubbly. That’s your green light.
Mix in eggs, melted butter, salt, then flour gradually. The dough should feel soft and slightly tacky, not stiff. Knead until smooth, then let it rise until doubled and pillowy.
While it rises, cook your filling. Brown the meat gently with onions, seasoning simply. Let it cool completely—this matters more than you think.
Divide the dough into small portions, flatten gently, add filling, and pinch closed. Don’t overstuff. Trust me.
Fry until golden or bake until lightly browned. Let them rest just a minute before eating. They’re hot little pockets of joy.
Chef’s Notes and Tips For A Flawless Russian Piroshki
First—cool filling is non-negotiable. Warm filling will tear dough and ruin the seal.
Second—don’t rush the rise. Soft piroshki come from relaxed dough, not forced speed.
Get Creative! Easy Substitutions and Fun Variations
Fill them with mashed potatoes and cheese, cabbage, mushrooms, or even sweet fillings like apple jam. Bake instead of fry for a lighter texture.
Piroshki are endlessly adaptable—that’s part of their charm.
Lighten It Up! Simple Swaps for a Healthier Piroshki
Bake instead of fry. Use lean ground meat. Try whole-wheat flour for part of the dough.
You’ll still get that cozy homemade piroshki with meat filling feeling—just a little lighter.
Closing
And there you have it. Warm, golden piroshki that feel like they’ve always belonged in your kitchen. Make them once, and they’ll become a tradition. Let me know how yours turn out—and don’t forget to explore more comforting recipes while you’re here.
Are You Curious About Anything Else? Take a Look at the Most Frequently Asked Questions We Get About This Recipe
What exactly are Russian piroshki?
Russian piroshki are small stuffed buns made with yeasted dough and filled with savory or sweet fillings. They’re a staple of Russian home cooking and street food.
A true Russian piroshki recipe focuses on soft dough and simple, comforting fillings rather than heavy spices.
Are piroshki fried or baked?
Traditionally, they’re often fried, especially street-style piroshki. But many home cooks bake them.
Both methods are authentic—it comes down to preference.
Why is my piroshki dough dense?
Dense dough usually means too much flour or not enough rise time. Dough should be soft and elastic.
Letting it rest and rise fully makes all the difference.
Can I make piroshki ahead of time?
Yes. You can shape them and refrigerate overnight or freeze after cooking.
They reheat beautifully in the oven.
What filling is most traditional?
Meat, cabbage, potato, and mushroom fillings are classic.
This traditional Russian piroshki recipe uses meat because it’s hearty and familiar.
Can I freeze piroshki?
Absolutely. Freeze cooked and cooled piroshki in airtight containers.
Reheat gently to maintain softness.
Why did my piroshki open while cooking?
Overfilling or poor sealing is usually the culprit.
Pinch firmly and place seam-side down when cooking.
Are piroshki served with anything?
Often just tea. Sometimes sour cream or mustard.
They’re meant to be simple, satisfying, and comforting.
Russian Piroshki
4
servings30
minutes40
minutes300
kcalIngredients
For the dough:
Warm milk
Active dry yeast
Sugar
Eggs
Butter or oil
All-purpose flour
Salt
For the filling (classic):
Ground beef (or beef/pork mix)
Onion
Salt and pepper
Directions
- Start with the dough. Bloom the yeast in warm milk with sugar—give it a few minutes until it looks alive and bubbly. That’s your green light.
- Mix in eggs, melted butter, salt, then flour gradually. The dough should feel soft and slightly tacky, not stiff. Knead until smooth, then let it rise until doubled and pillowy.
- While it rises, cook your filling. Brown the meat gently with onions, seasoning simply. Let it cool completely—this matters more than you think.
- Divide the dough into small portions, flatten gently, add filling, and pinch closed. Don’t overstuff. Trust me.
- Fry until golden or bake until lightly browned. Let them rest just a minute before eating. They’re hot little pockets of joy.